


Ollama is an open-source tool designed for running large AI language models (LLMs) locally. By hosting LLMs on your personal machine or a virtual private server (VPS), you maintain complete control over your data while avoiding the potential risks of cloud services. For developers, researchers, and businesses focused on data privacy, Ollama is an invaluable resource.
However, this flexibility comes with a critical security challenge: if not properly secured, your server could be left wide open for anyone to access. In fact, a recent search on Shodan.io revealed a concerning reality. By using the filter port:11434 html:"Ollama", over 4,900 Ollama servers were found to be publicly accessible.
Models Found on Open Ollama Servers
Many of these open servers exposed the following models, illustrating the risk of leaving your server unsecured:
- llama2 – 186 occurrences
- llama3.1 – 176 occurrences
- llama3 – 166 occurrences
- llama3.2 – 152 occurrences
- nomic-embed-text – 126 occurrences
- qwen:0.5b – 104 occurrences
- mistral – 97 occurrences
- llama3.1:8b – 70 occurrences
- llama3.1:70b – 62 occurrences
- gemma2 – 61 occurrences
These servers are not just vulnerable to unauthorized access; they are ripe for exploitation. Hackers, competitors, or even casual users could misuse these resources, steal data, or overload the server.
Why You Should Secure Your Ollama Server
Leaving your Ollama server exposed is equivalent to letting strangers raid your fridge—they’re consuming your resources, potentially stealing sensitive data, and could even misuse your setup maliciously. Without authentication or firewall restrictions, your server could face:
- Resource Overload: Unauthorized users might exploit your computational power without your consent.
- Data Theft: Sensitive data being processed or stored could be exposed to attackers.
- Malicious Activity: Your server could be used for unintended purposes, like generating spam or harmful content.
The Solution: Protecting Your Ollama Server with WireGuard
To safeguard your server, it’s critical to restrict access. One effective solution is to place your server behind a WireGuard VPN. TorGuard’s Dedicated WireGuard service offers a simple and robust way to implement this. With its firewall dashboard, you can control which IP addresses are allowed to access your server, ensuring your LLM remains private and secure.
Here’s a step-by-step guide to securing your Ollama server.
Step 1: Install WireGuard on Your Server
Start by installing WireGuard on your local machine or VPS. Run the following commands:
sudo apt update
sudo apt upgrade
sudo apt install wireguard resolvconf curl
Generate Your WireGuard Configuration
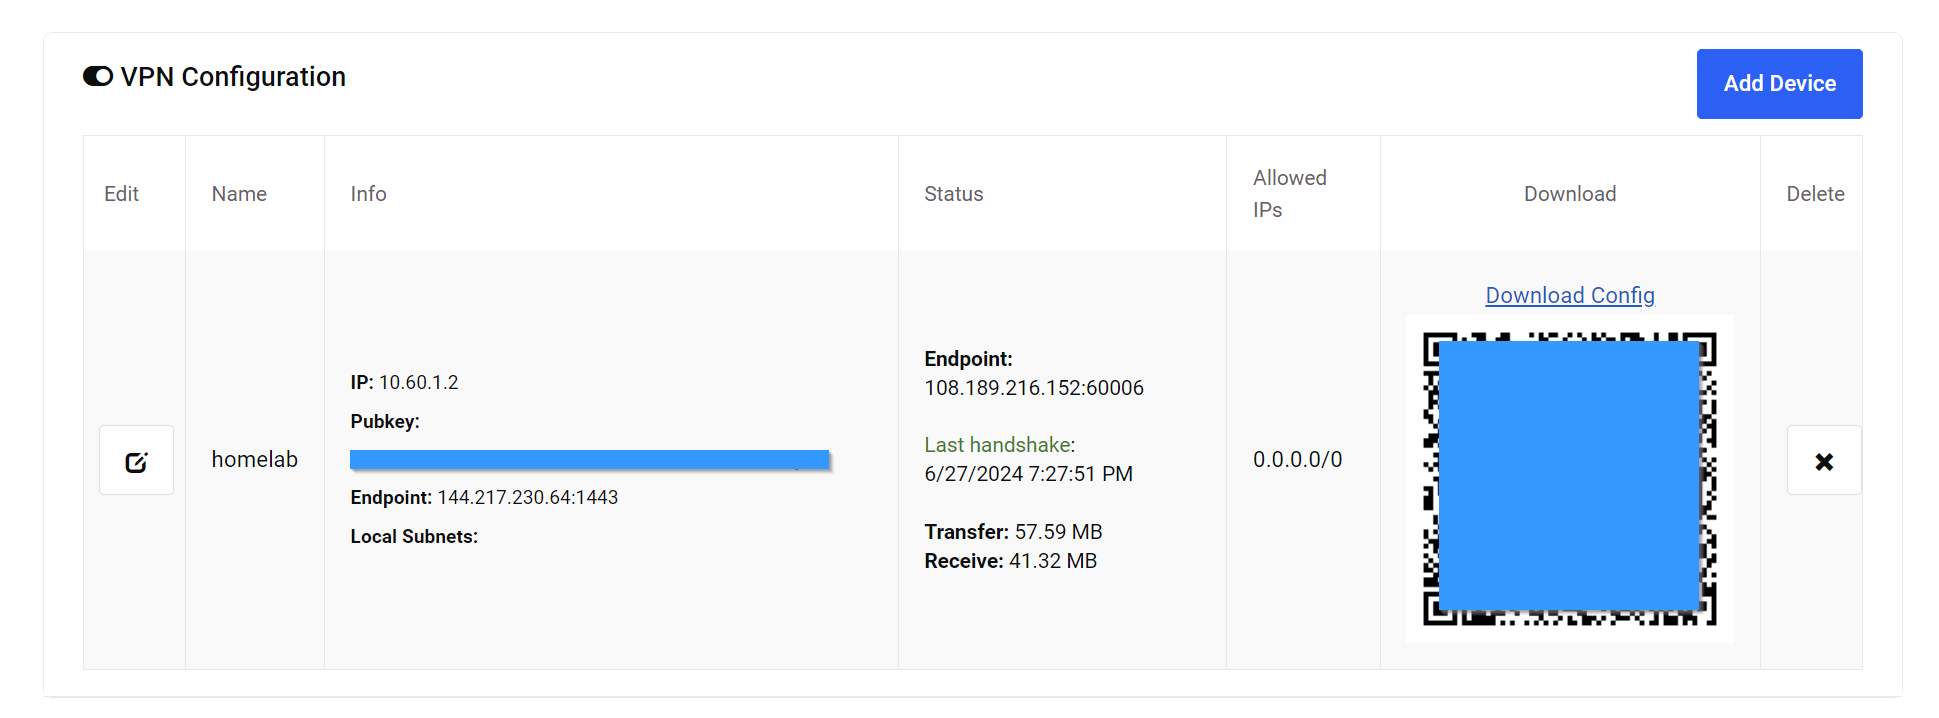
- Log in to the TorGuard Member Area.
- Select your Private VPN Cloud service and click Add Device.
- Download the WireGuard configuration file. The configuration will include:
- External VPN Server Endpoint IP (e.g., 144.217.230.64)
- Internal WireGuard IP (e.g., 10.60.1.2)
- Open the configuration file on your server using the
nanoeditor:
sudo nano /etc/wireguard/wg0.conf
- Paste the configuration, save with
CTRL + O, and exit withCTRL + X. - Enable and start WireGuard:
sudo systemctl enable [email protected]
sudo systemctl daemon-reload
sudo systemctl start wg-quick@wg0
sudo systemctl status wg-quick@wg0
Step 2: Configure Your Domain (Optional)
If you want to access your Ollama server via a custom domain, follow these steps:
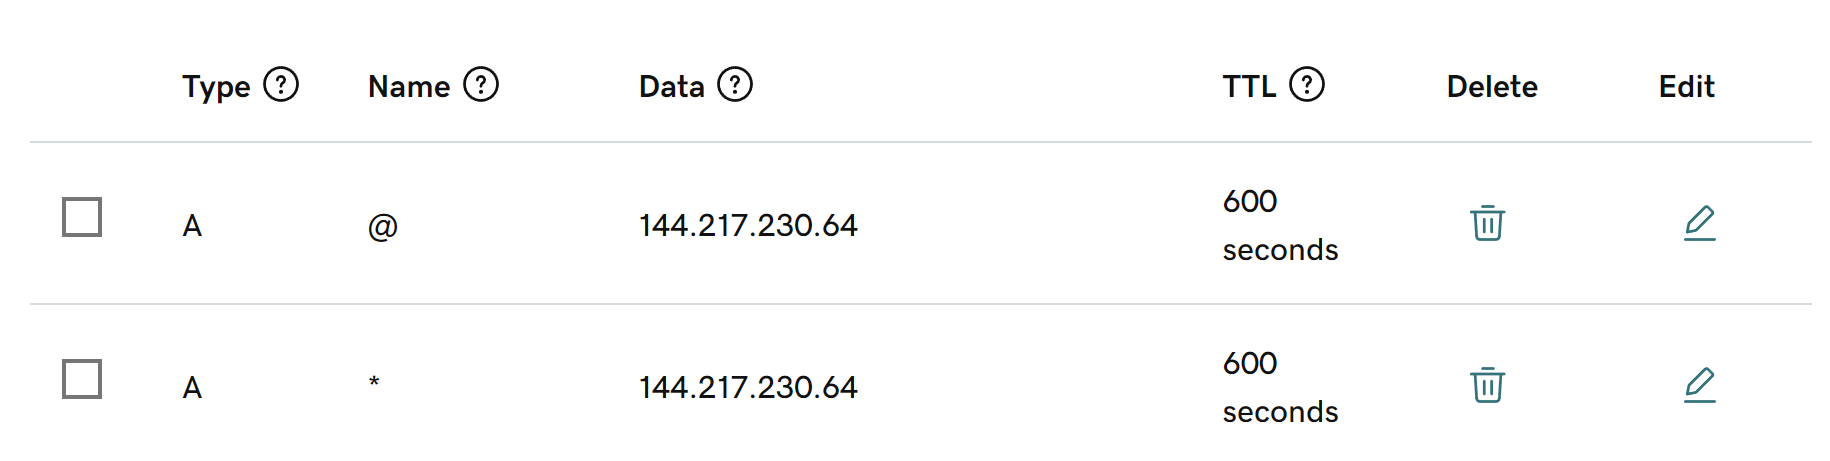
- Log in to your domain registrar (e.g., GoDaddy).
- Add DNS records:
- An A record for
@pointing to your VPN Server Endpoint IP. - A wildcard A record for
*pointing to the same IP (for subdomains).
- An A record for
This allows you to access your server using URLs like ollama.yourdomain.com.
Step 3: Set Up Port Forwarding
Port forwarding allows you to control which services are accessible through your VPN. TorGuard’s Dedicated WireGuard service makes this process straightforward:
- Log in to the TorGuard Member Area.
- Navigate to VPN Server Settings and click Add Rule under Port Forward Rules.
- Add two rules for the following ports:
- Port 80 (for HTTP traffic)
- Port 443 (for HTTPS traffic)
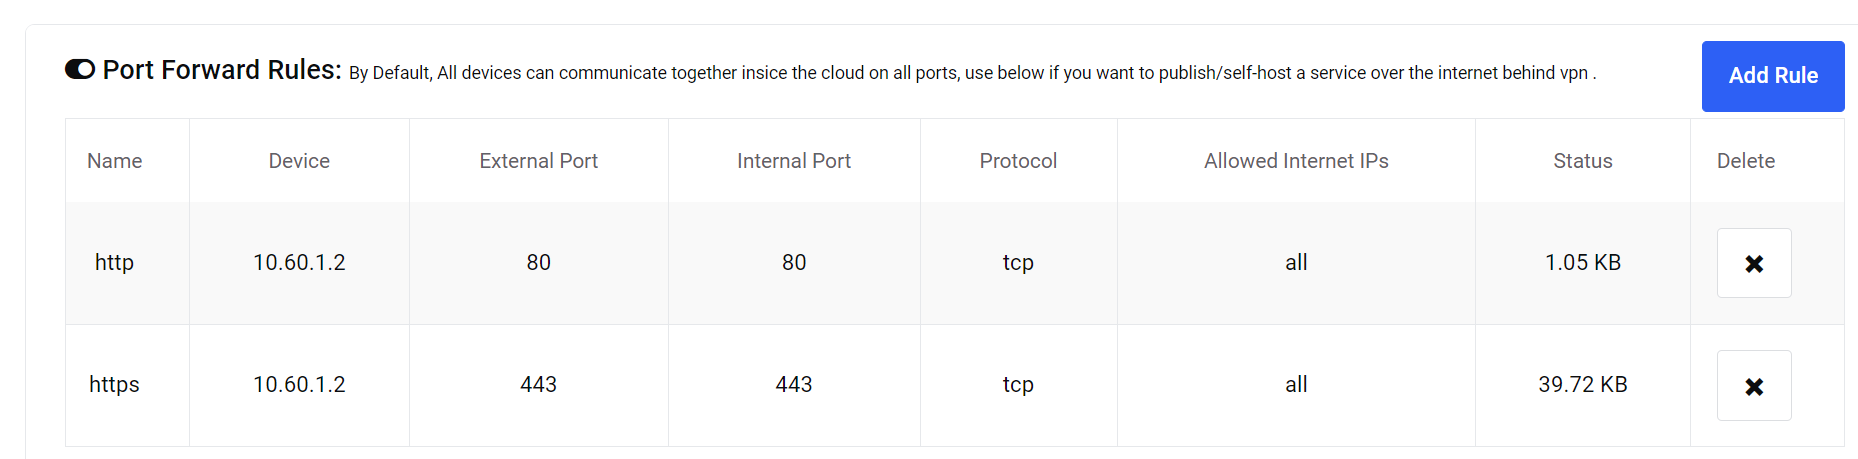
- Specify Allowed IPs to restrict access. For example:
- Add the IPs of trusted users for secure access.
- Leave this field blank if you are using server-side authentication.
Step 4: Test and Monitor
- Start your Ollama server behind the WireGuard VPN.
- Test access by visiting your domain or VPN endpoint.
- Regularly monitor the TorGuard firewall dashboard to ensure unauthorized IPs are not accessing your server.
Why Choose TorGuard’s WireGuard Service?
- Robust Security: Restrict access to trusted IPs only.
- Simple Configuration: Easily manage firewall and port forwarding settings.
- High Performance: Enjoy low-latency, secure connections for optimal server performance.
Keep Your Server Locked Down
With over 4,900 Ollama servers found exposed on Shodan.io, the importance of securing your setup cannot be overstated. By following these steps and using TorGuard’s Dedicated WireGuard service, you can ensure your Ollama server is protected from unauthorized access, misuse, and security breaches.
Stay focused on utilizing your LLM applications without worrying about network vulnerabilities—lock the door on your server and take control of your resources.