

These days, the term "mesh wifi" is frequently used as a marketing buzzword, with many network extenders merely acting as general repeaters and not truly utilizing the underlying mesh technology. This raised an intriguing question for us at TorGuard: How challenging would it be to extend TorGuard VPN access through OpenWRT routers, leveraging real-world mesh wifi capabilities? Our exploration revealed that this is not a straightforward task, often turning into a time-consuming venture even for seasoned OpenWRT enthusiasts. Recognizing this complexity, we've embarked on a mission to integrate mesh capabilities into all PrivateRouter OpenWRT hardware that supports the 802.11s standard. In pursuit of this goal, we're excited to announce the first beta release of our Mesh app for PrivateRouter users, harnessed by the batman-adv protocol.
But why opt for a mesh setup when a simple WiFi repeater might suffice? The answer hinges on your specific requirements. In our scenario, we aimed to empower users with the ability to extend remote access VPN capabilities through local WiFi. This approach is designed to deliver rapid speeds over an extensive area, catering to all your IoT devices, security cameras, self-hosted servers, and yes, even ensuring you can stream your favorite shows from the comfort of your garden. To achieve this, a stable, self-healing mesh network setup is crucial. It should be capable of assigning local devices an IP address from a designated range that's permitted through your TorGuard Wireguard gateway. Essentially, the Mesh network serves as an expansive WiFi switch, funneling all node traffic through the primary VPN connection.
In this post, we'll delve into the fundamental setup process. However, it's worth noting that the batman-adv routing protocol is versatile enough to support even the most intricate mesh routing requirements, including multiple gateways, bridges, and client nodes. For the purpose of this guide, we'll keep things straightforward.
A Basic VPN Mesh WiFi Setup
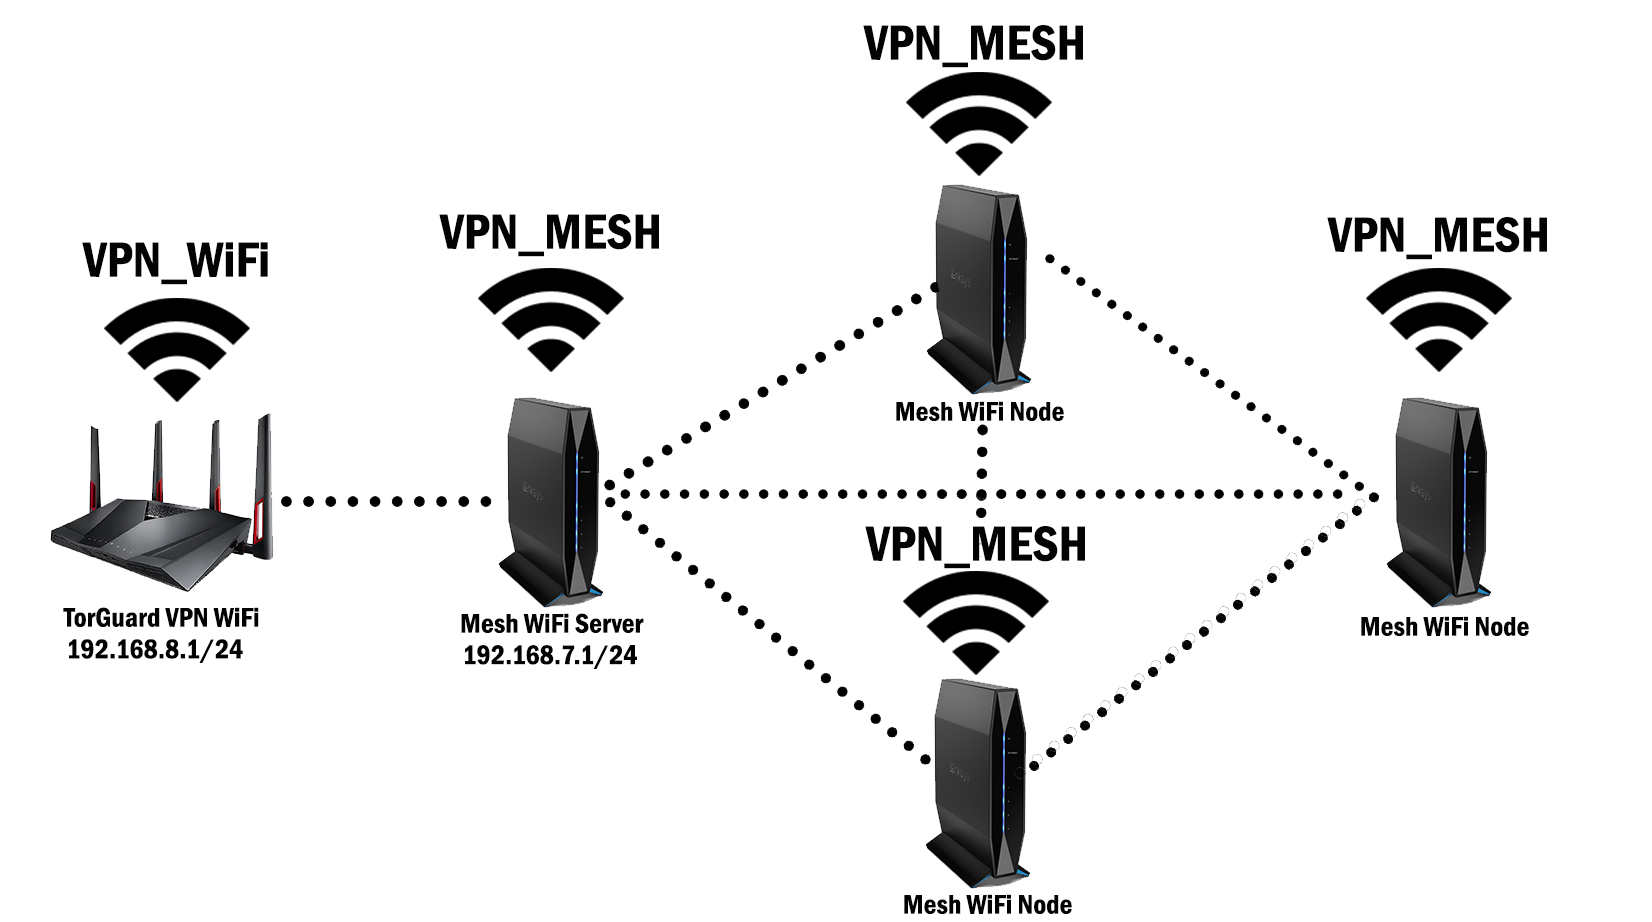
In the realm of mesh WiFi setups, the diversity of VPN protocols and router hardware presents a variety of configurations. Take, for instance, our setup where we employ an ASUS AC88U as the cornerstone of our network. This router runs the primary Wireguard VPN connection, utilizing TorGuard’s private Wireguard service for remote access. Yet, the flexibility of OpenWRT allows for alternative protocols such as TorGuard’s OpenVPN, OpenConnect, SSTP, or V2ray proxy service to be integrated into this same router, depending on your specific networking needs. Importantly, any VPN-capable router can be used for this purpose, and it doesn't necessarily need to have mesh capabilities.
For the sake of simplicity and to avoid the clutter of LAN cables, our Mesh server communicates with the VPN router over AC WiFi. The Linksys E8450 serves as the hub of this setup, acting both as the DHCP server and the internet access gateway for all mesh nodes. We have a particular fondness for the Linksys E8450 due to its robust mesh capabilities and compatibility with OpenWRT.
One of the key benefits of this mesh setup is its dynamic routing ability. The batman-adv routing protocol efficiently directs client traffic to the server based on their physical location within the network. Should a node become saturated with client connections, this intelligent protocol will reroute clients to the next optimal node, ensuring an even distribution of network traffic. Furthermore, the nodes within this mesh network are mobile; they can be relocated, added, or removed at any time, providing unparalleled flexibility.
Perhaps the most significant advantage of a mesh setup is its capacity to function as a vast "WiFi switch" for your VPN connection, covering a substantial area. Any device that connects to the mesh network can access your gateway VPN router, and vice versa. This bi-directional connectivity is particularly crucial for extending coverage to peripheral devices, such as NVR cameras, ensuring that even the most remote clients on your network remain securely connected to your VPN.
Enabling Mesh in PrivateRouter OpenWRT
For those utilizing mesh-capable PrivateRouter devices, such as the Linksys E8450, GL.inet GL-MT1300, TP-Link C7, or GL.inet AR750S, diving into the world of mesh networking is now more accessible. To get started with this new integration, begin by rebooting your router. Once it's back online, navigate to the system/software menu. Here, you should search for the package luci-app-easymesh. Additionally, ensure that wpad-mesh-openssl is installed; if it's not already present, search for this package and install it.
Mesh Server Setup
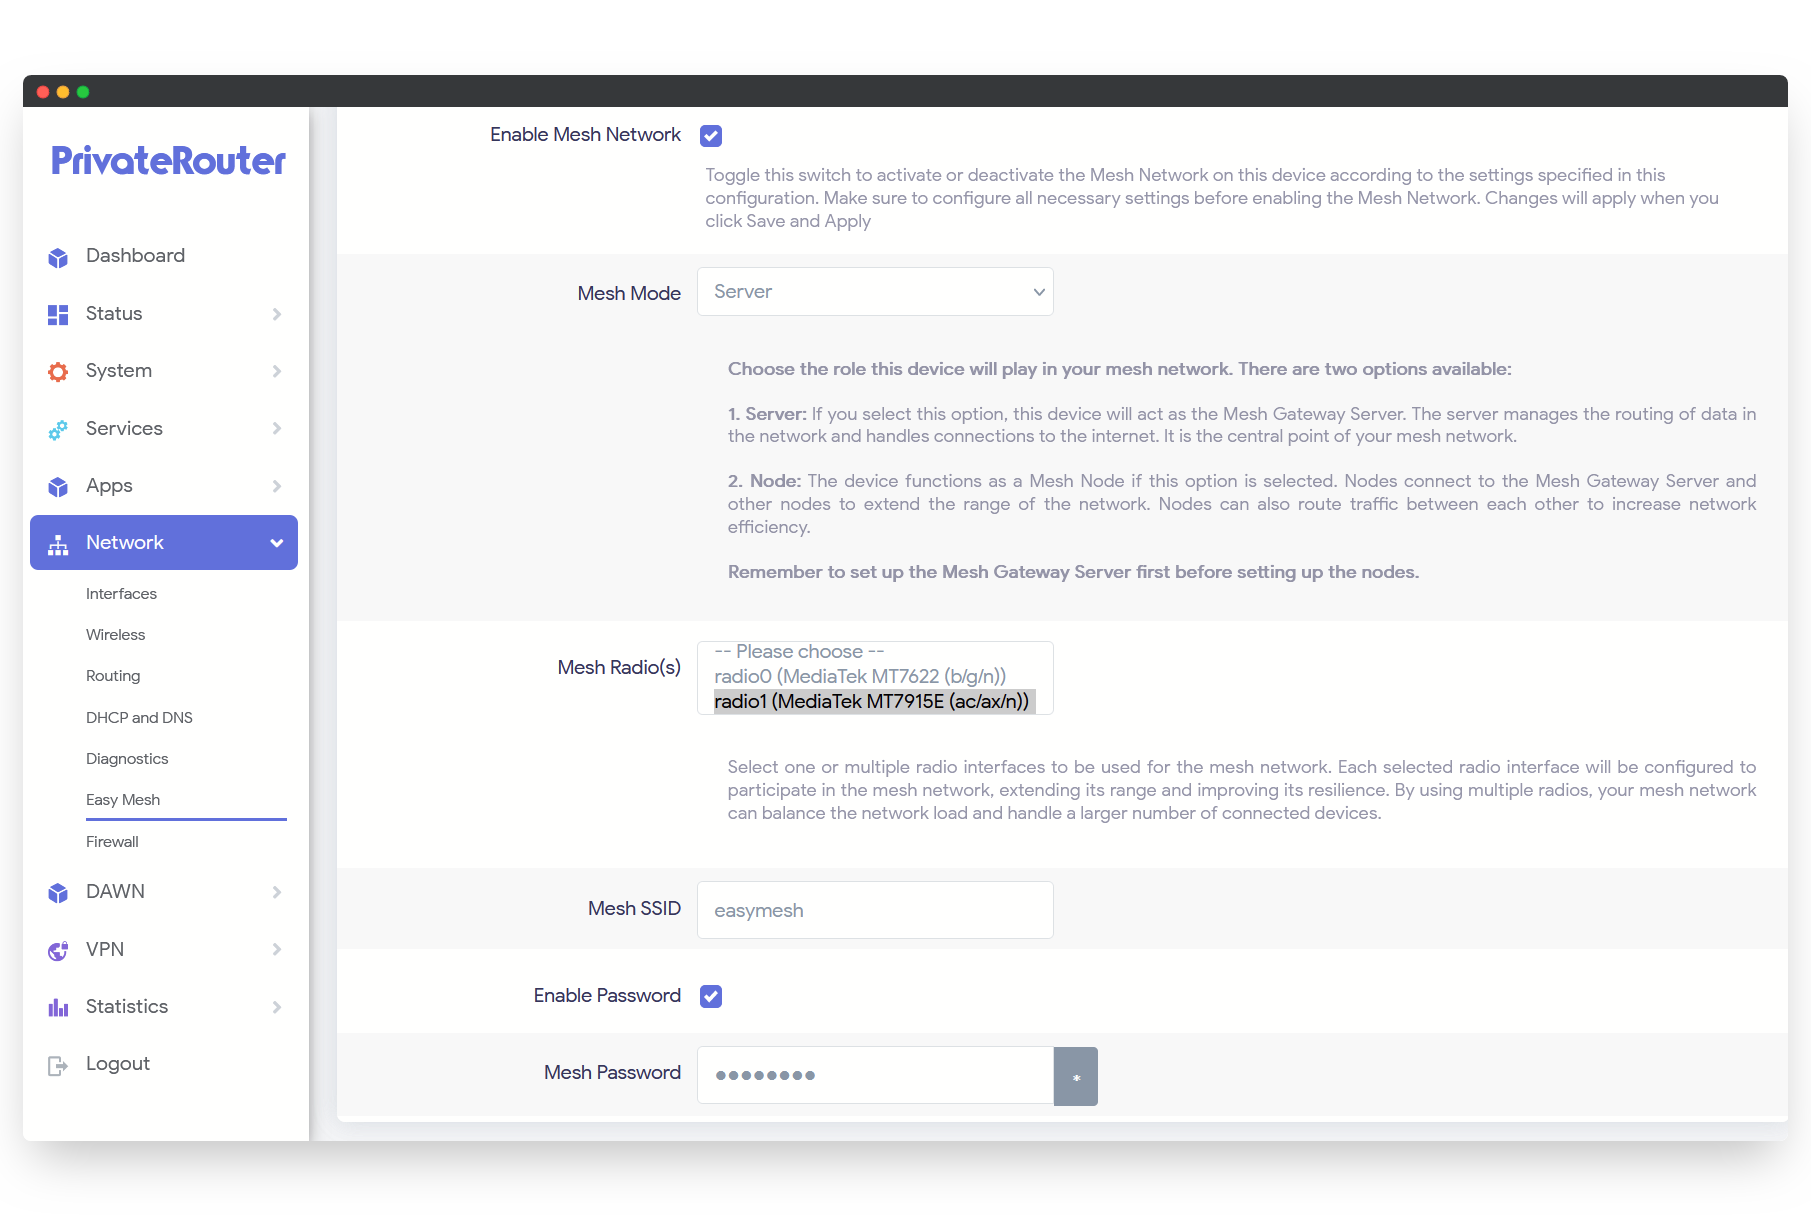
The first step involves setting up the mesh server. This server will connect to your VPN router via WiFi to access the internet and will provide DHCP and traffic routing services to your mesh network nodes. Start by ensuring that the mesh server is connected to your VPN router via WiFi. Then, in the router's interface, select 'Network' from the side menu and click on “Easy Mesh”. In this menu, enable the “easymesh” option, and in the mesh mode dropdown menu, select “Server”. You’ll want to choose the AC-capable radio1 and set up a mesh WiFi network name and password. After configuring these settings, click 'Save', then 'Save and Apply'.
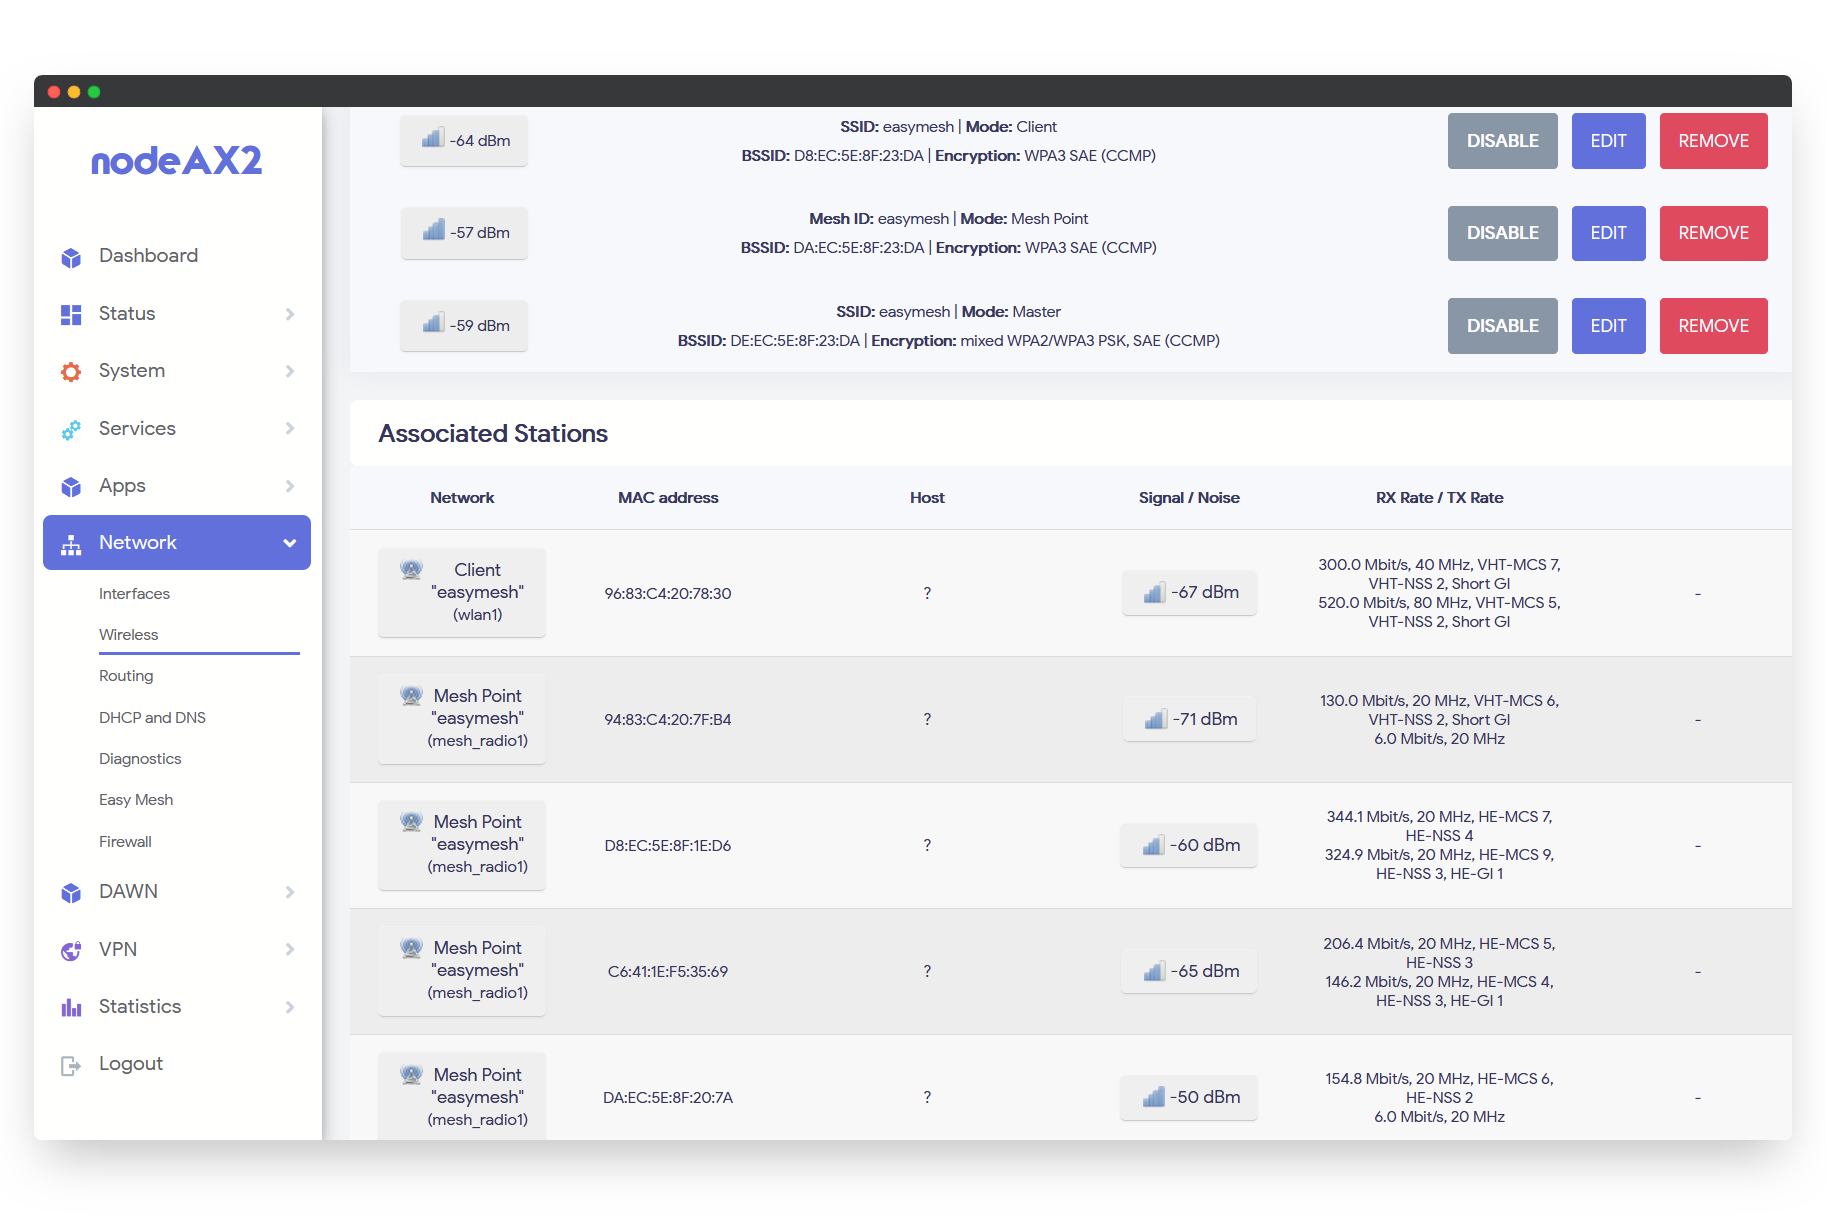
To confirm that the setup is successful, go to the 'Network' menu and select 'Wireless'. You should see a new mesh WiFi Master, Mesh Point, and the Client connection to your VPN router. With these elements in place, your server is ready to communicate with mesh nodes.
Mesh Node Setup
Next, you’ll set up the mesh nodes to connect to the server. This process is to be repeated for each mesh node in your network. Navigate to the 'Network' tab and select “Easy Mesh”. Enable the mesh feature and, this time, choose “Node” in the mesh mode dropdown menu. Click the AP mode tab and assign a hostname to identify this particular mesh node, then click 'Save' and 'Save and Apply'. Proceed to the 'Network/Wireless' screen and connect radio1 Wireless to the mesh server’s WiFi access point (AP). Here, you should also see the newly added mesh point and master under radio1.
Now that the node’s wireless configuration is complete, the next step is to switch it into “Dumb AP” mode. This ensures the server handles DHCP. Under the mesh settings/AP Mode tab, select the “Enable Dumb AP Mode” button, and then reboot the node.
Finally, connect your computer to the newly added mesh WiFi SSID and access the mesh server’s IP address through a browser. This server is the central hub for all node communications. Upon accessing it, you should see a new device and IP connected, corresponding to the node hostname you set earlier. Copying the node's IP address and accessing it in a web browser will load the OpenWRT menu for that node. Here, you can verify or update settings and observe the mesh points connected to the server.
By adhering to the outlined steps, you can successfully establish a mesh network in your PrivateRouter OpenWrt device, thereby extending your network's coverage and improving its efficiency. Our support for the open-source batman-adv routing protocol aims to revitalize older WiFi routers, repurposing them for mesh functionality, despite their initial design not catering to this use. This initiative offers an economical solution to leverage everyday hardware, transforming it into a powerful tool that facilitates the extension of VPN access across vast areas.